Feeds:
Posts
Comments

Archive for June, 2007

Blossoms Abound

img_3403yla_cc.jpg

I haven’t been able to participate in any of Splitcoast’s challenges for weeks and weeks until today–I have really missed them!  The Color Challenge today called for us to use Barely Banana, Creamy Caramel and Real Red.  I purchased this set, Blossoms Abound, several weeks ago because of this stunning card created by Splitcoast user flowerbugnd1.  If you’re not a Stampin’ Up! demonstrator, you will not be able to view her original card, but you can still view her gallery if you click on her name in this post.  I love all of the artwork she creates–she is extremely talented and creative!

The lilacs on this card were created using the Melted Pearls Technique.  First, stamp the Weathered background in Creamy Caramel ink on Very Vanilla cardstock.  Next, stamp the more solid-looking lilac in Real Red ink.  Rub an Embossing Buddy on the panel to remove static and moisture, then stamp the second lilac image in VersaMark ink over the Real Red lilacs.  Emboss with Clear Embossing Powder and then apply Flamingo Pink Pearl Ex Powder with a Q-tip.  Tap the excess powder off and then heat set again.  Wipe off any remaining powder gently with a cottonball. 

The “cracks” in the lilac panel were created by cutting a “v” with a pair of Paper Snips.  The edges of this panel were darkened by using the direct-to-paper method–simply slide your ink pad on the edges of your cardstock to create a weathered look.  To create the Print Pattern background, apply Barely Banana ink to the stamp.  Highlight the edges of each diamond with a Creamy Caramel Marker.  Lightly mist the stamp with a water bottle and stamp off once on scrap paper.  Mist the stamp again and stamp on Barely Banana cardstock.  I think the rest of the card is pretty straightforward to create.  Thanks so much for visiting today!

All materials by Stampin’ Up!

Stamps: Blossoms Abound, Weathered, Print Pattern, Happy Everything.  Paper: Very Vanilla, Real Red, Barely Banana, Creamy Caramel.  Ink: Real Red, Creamy Caramel, VersaMark, Old Olive, Basic Black.  Accessories: Clear Embossing Powder, Flamingo Pink Pearl Ex Powder, Embossing Buddy, Paper Snips, Stampin’ Dimensionals, Sewing Machine & Thread, Pewter Hodgepodge Hardware, Red Grosgrain Ribbon, Caramel Gingham Ribbon, Real Red Brads.  Technique:  Melted Pearls

Read Full Post »

In Full Bloom

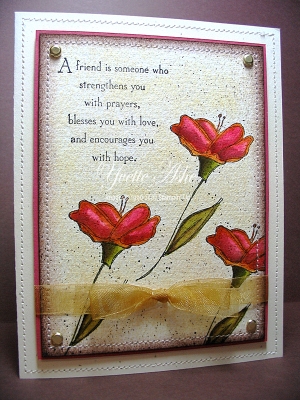
img_3347yla_blog.jpg

It’s been weeks and weeks since I’ve stamped just for fun!  The idea for this card has been floating around in my head for the last several days and I finally had time to put it together today.

The flowers were stamped in Black StazOn ink on watercolor paper and watercolored with an Aqua Painter and Reinker ink (Rose Red, More Mustard, Chocolate Chip and Old Olive).  I sponged the edges of the panel with Chocolate Chip ink and then stitched around the edges with my sewing machine.  If you want your stitches to remain white, sponge first and then sew last (I learned the hard way once).  It’s hard to see, but I masked the flowers and then stamped the Canvas background stamp in So Saffron ink.  I also used the Color Spritzer Tool with a Chocolate Chip Marker to create some spattering on the panel as well.  I attached the flower panel to a piece of Rose Red cardstock and popped it up on dimensionals on the Confetti Cream card base.  To see the finer details, please click on the photo.  Thanks so much for visiting today!

All materials by Stampin’ Up!

Stamps: In Full Bloom, God’s Blessings, Canvas.  Paper: Watercolor, Rose Red, Confetti Cream.  Ink: Black StazOn, Rose Red, More Mustard, Chocolate Chip, Old Olive, So Saffron.  Accessories: Aqua Painter & Reinkers, Sponge, Gold Brads, Dimensionals, Gold Narrow Organdy Ribbon, Sewing Machine & Thread, Color Spritzer Tool.

Read Full Post »

Lip Balm Holders


img_3327yla_blog.jpg
 

I recently discovered these clever lip balm holders created by Renee O. over on Splitcoast.  Renee graciously gave me permission to post my version of her lip balm holders here on my blog.  Please take a moment to visit her gallery by clicking on her name here in this post.  She has a bunch of truly fabulous and clever 3-D projects, as well as card ideas! 

My holders are a bit smaller than Renee’s.  I revised the dimensions so that you can cut five base pieces out of one 8-½” x 11” sheet of cardstock.  To create the holders, you will need the following:                                                                         

1 – 5-¾” x 2-¾” base piece of Basic Black cardstock scored at 2-½” and 3-¼”

1 – 5-¾” x 2-¾” base piece of Pretty in Pink cardstock scored at 2-½” and 3-¼”

img_3332yla_blog.jpg

1 – 2” x 2” piece of Whisper White cardstock

1 – 2-1/8” x 2-1/8” piece of Basic Black cardstock

13” piece of Black Gingham Ribbon

ChapStick Tube

To make the strap that holds the ChapStick in place, do the following:

1.  Place the scored piece of Basic Black cardstock on Stampin’ Up!’s Grid Paper down in the bottom left corner as shown.    

2.  Find the center of the cardstock running lengthwise (top to bottom).  The center of this piece is 1-3/8”.  With a pencil, draw a 1-¼” line starting from the top score line (it will go past the bottom score line by one half inch.)                                 

3.  Once you have your center line marked, move your ruler over ¼” to the left of the center line.  Draw a 1-¼” line starting from the top score line.

4.   Now move your ruler over ¼” to the right of the center line.  Draw a 1-¼” line starting from the top score line.

5.  Erase the middle line and use your paper trimmer to cut the two slits by following the two remaining lines.

img_3336_blog.jpg

*

img_3339_blog.jpg 


To decorate the outside of the scored Pretty in Pink base, wheel the Petals Jumbo Wheel in Pretty in Pink ink.  Stamp two flowers from the Polka Dots & Paisley set in Pretty in Pink ink on the 2”x2” piece of Whisper White cardstock.  Stamp the outline of the flower head in Basic Black ink over the top of the two flowers.  Stamp the words “happy” and “summer” in Basic Black ink.  Attach flower piece to Basic Black panel.  Now you can attach the Pretty in Pink base to the Basic Black base by using a strong adhesive (Sticky Strip Tape works great).  Insert the ChapStick in the strap.  Close the holder by wrapping the Black Gingham Ribbon around the outside of the holder and tie in a bow.  Lastly, attach the happy summer panel to the front of the holder.

img_3340_blog.jpg


I gave these as gifts to my stamp camp attendees last weekend and they were a huge hit!  I found the Breast Cancer Awareness ChapStick at Walmart.  They came in a package of three and were around $3.00 for one package.

img_3343_blog.jpg


Read Full Post »